 James
James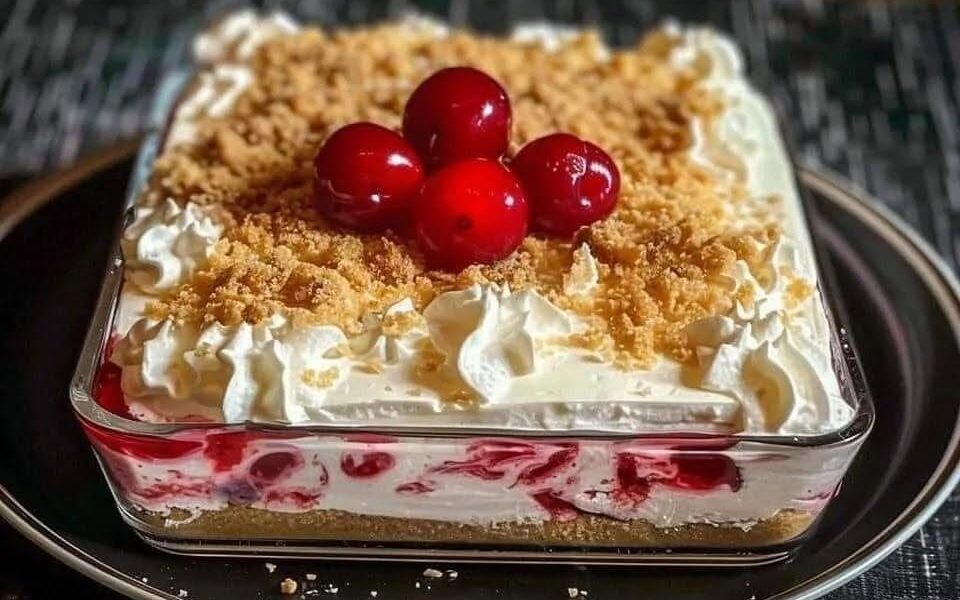
Cherry Cheesecake Lush Layers is a rich, creamy, and beautifully layered no-bake dessert that combines a buttery crust, smooth cheesecake filling, fluffy whipped topping, and sweet cherry pie topping. It is perfect for family gatherings, holiday celebrations, potlucks, birthdays, or anytime you want an easy dessert that looks impressive and tastes amazing. The combination of crunchy crust, velvety cream cheese layer, light pudding layer, and juicy cherries creates a wonderful contrast of textures and flavors.
Ingredients
For the Crust
- 2½ cups graham cracker crumbs
- ¾ cup unsalted butter, melted
- 2 tablespoons granulated sugar
For the Cheesecake Layer
- 16 ounces cream cheese, softened
- 1 cup powdered sugar
- 1 teaspoon vanilla extract
- 1½ cups whipped topping
For the Creamy Pudding Layer
- 2 packages instant vanilla pudding mix
- 3 cups cold milk
- 1 teaspoon vanilla extract
For the Topping
- 2 cups whipped topping
- 1 large can cherry pie filling
Optional Garnishes
- Fresh cherries
- White chocolate shavings
- Crushed graham crackers
- Toasted almonds
- Mint leaves
Equipment Needed
- 9×13-inch baking dish
- Mixing bowls
- Electric mixer
- Rubber spatula
- Measuring cups and spoons
- Offset spatula for smoothing layers
- Refrigerator
Step 1: Prepare the Crust
In a large bowl, combine graham cracker crumbs and sugar. Pour in the melted butter and stir until every crumb is evenly coated. The mixture should resemble wet sand and hold together when pressed between your fingers.
Transfer the mixture to a 9×13-inch baking dish. Press it firmly and evenly across the bottom of the pan. Use the flat bottom of a measuring cup to compact the crust. This helps create a sturdy foundation for the layers.
Place the crust in the refrigerator for at least 20 minutes to firm up. Chilling prevents the crust from crumbling when the dessert is sliced later.
Step 2: Make the Cheesecake Layer
Place softened cream cheese into a large mixing bowl. Beat until completely smooth and free of lumps. Add powdered sugar and vanilla extract.
Continue beating until the mixture becomes silky and creamy. Fold in the whipped topping gently using a spatula. Mixing slowly helps maintain a light and fluffy texture.
Spread the cheesecake mixture evenly over the chilled crust. Smooth the surface carefully so the next layer sits evenly on top.
Return the pan to the refrigerator while preparing the pudding layer.
Step 3: Prepare the Pudding Layer
In a clean mixing bowl, whisk together instant vanilla pudding mix, cold milk, and vanilla extract.
Whisk continuously for several minutes until the pudding begins to thicken. Allow it to stand briefly so it reaches a soft, spreadable consistency.
Carefully spread the pudding over the cheesecake layer. Work gently to avoid disturbing the layer beneath.
Smooth the top with a spatula and refrigerate for another 15 to 20 minutes.
Step 4: Add the Whipped Layer
Spread the remaining whipped topping over the pudding layer. Take your time to create an even surface.
This fluffy layer balances the richness of the cream cheese and provides a beautiful backdrop for the cherry topping.
Use long, smooth strokes with a spatula for a polished appearance.
Step 5: Add the Cherry Topping
Spoon the cherry pie filling over the whipped topping layer.
Spread gently from edge to edge, ensuring an even distribution of cherries and glaze. The vibrant red color creates a stunning presentation and gives the dessert its signature flavor.
If desired, arrange extra fresh cherries on top for an elegant finish.
Step 6: Chill Thoroughly
Cover the baking dish with plastic wrap.
Refrigerate for at least 4 hours, though overnight chilling is recommended. Extended chilling allows all layers to set properly and makes slicing easier.
The flavors also meld together beautifully during this resting period.
Serving Suggestions
Serve chilled directly from the refrigerator.
This dessert pairs wonderfully with:
- Fresh coffee
- Hot tea
- Iced coffee
- Vanilla latte
- Fresh berries
- Chocolate drizzle
- Toasted nuts
For special occasions, garnish each slice with whipped cream and a fresh cherry.
Tips for Success
- Always use softened cream cheese for a smooth filling.
- Chill between layers when possible.
- Use cold milk for the pudding mixture.
- Refrigerate overnight for the best texture.
- Spread layers gently to keep them distinct.
- Use a sharp knife for clean slices.
- Wipe the knife between cuts for professional-looking servings.
Flavor Variations
Chocolate Cherry Lush
Add a layer of chocolate pudding instead of vanilla pudding for a chocolate-covered cherry flavor.
Almond Cherry Version
Add almond extract to the cheesecake filling and garnish with sliced almonds.
Berry Cheesecake Lush
Replace cherry topping with mixed berry pie filling.
Lemon Cherry Lush
Mix lemon zest into the cheesecake layer for a bright citrus flavor.
Oreo Cherry Lush
Substitute crushed chocolate sandwich cookies for the graham cracker crust.
White Chocolate Cherry Lush
Fold melted white chocolate into the cheesecake mixture for extra richness.
Storage
Store covered in the refrigerator for up to 4 days.
Keep the dessert chilled until ready to serve. Because of the cream cheese and dairy ingredients, it should not remain at room temperature for extended periods.
Freezing is possible for up to 1 month. Thaw overnight in the refrigerator before serving.
Make-Ahead Instructions
Cherry Cheesecake Lush Layers is an excellent make-ahead dessert. Prepare it a day before serving and refrigerate overnight. The extra chilling time helps the layers become firm and enhances the overall flavor.
This dessert is ideal for holidays, summer gatherings, family dinners, potlucks, picnics, birthday celebrations, and festive occasions because it can be made well in advance while still tasting fresh and delicious.
The final result is a creamy, dreamy dessert featuring a buttery graham cracker crust, smooth cheesecake filling, luscious vanilla pudding, fluffy whipped topping, and a vibrant cherry layer that creates a beautiful and irresistible treat everyone will enjoy.