
 James
James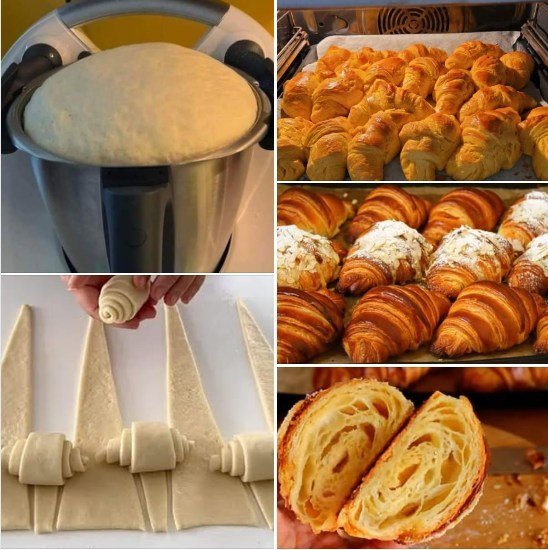
Croissant (Buttery & Flaky) — Complete Detailed Recipe
Making classic croissants from scratch is a long process, but the reward is layers of crisp, buttery pastry with a honeycomb interior and rich aroma. This recipe is intentionally very detailed so you can follow every stage carefully.
Introduction
Croissants are a laminated dough pastry made by repeatedly folding butter into dough to create dozens of delicate layers. During baking, water inside the butter turns to steam, separating the layers and creating the famous flaky texture.
Traditional croissants require patience more than difficulty. The key is temperature control, proper resting, and gentle handling.
This recipe makes about 12 large croissants.
Total Time
Preparation spans 2 days.
Day 1:
- Mix dough
- Prepare butter block
- Laminate dough
- Chill overnight
Day 2:
- Shape
- Proof
- Bake
Active work time is around 4 hours total.
Ingredients
For the Dough
- 500 grams bread flour
- 60 grams sugar
- 10 grams salt
- 10 grams instant yeast
- 300 milliliters cold whole milk
- 50 grams softened unsalted butter
For the Butter Layer
- 280 grams high-quality unsalted butter
For Egg Wash
- 1 egg
- 1 tablespoon milk
Equipment
- Rolling pin
- Large work surface
- Plastic wrap
- Sharp knife or pizza cutter
- Baking trays
- Parchment paper
- Pastry brush
- Ruler
- Kitchen scale
Understanding Lamination
The flaky structure comes from alternating layers of dough and butter.
Every fold multiplies layers.
After:
- First fold = 3 layers
- Second fold = 9 layers
- Third fold = 27 layers
During baking, steam expands between these layers.
Step 1 — Mixing the Dough
In a large bowl combine:
- Bread flour
- Sugar
- Salt
- Instant yeast
Keep salt and yeast separated initially because direct contact can weaken yeast activity.
Pour in cold milk slowly while mixing.
Add softened butter.
Mix until a rough dough forms.
Knead for about 5–7 minutes until:
- Smooth
- Elastic
- Slightly tacky
The dough should not be sticky.
If too dry:
- Add 1 tablespoon milk
If too wet:
- Add a little flour
Do not overknead because excessive gluten development makes rolling difficult later.
Step 2 — First Rest
Shape dough into a rectangle.
Wrap tightly.
Refrigerate for at least 2 hours.
Cold dough is essential because warm dough causes butter leakage during lamination.
Step 3 — Preparing the Butter Block
Place butter between two sheets of parchment paper.
Using a rolling pin:
- Pound gently
- Shape into a rectangle
Target size:
- About 7 x 10 inches
Butter should be:
- Flexible
- Cold
- Not brittle
- Not melting
If butter cracks:
- It is too cold
If butter squishes:
- It is too warm
Ideal butter texture feels like modeling clay.
Step 4 — Locking In the Butter
Roll chilled dough into a rectangle roughly double the butter size.
Place butter block in center.
Fold dough over butter like an envelope.
Seal edges carefully so butter cannot escape.
At this stage you now have:
- Dough
- Butter
- Dough
This is the foundation of lamination.
Step 5 — First Roll and Fold
Lightly flour work surface.
Roll dough gently lengthwise.
Never press too hard.
The goal:
- Lengthen layers
- Keep butter evenly distributed
Roll into long rectangle approximately:
- 8 x 24 inches
Brush excess flour away.
Fold dough into thirds like a business letter.
This is called:
- Single fold
- Letter fold
Wrap dough.
Chill 30–45 minutes.
Step 6 — Second Fold
Rotate dough 90 degrees.
Roll again into long rectangle.
Keep edges straight.
Fold into thirds again.
Wrap and chill.
During this rest:
- Gluten relaxes
- Butter firms
Skipping chilling creates broken layers.
Step 7 — Third Fold
Repeat rolling and folding one final time.
After third fold:
- Dough becomes smoother
- Layers become refined
- Butter distribution improves
Refrigerate overnight.
This overnight rest dramatically improves flavor.
Slow fermentation develops:
- Aroma
- Complexity
- Better texture
Day 2 — Shaping the Croissants
Step 8 — Rolling Final Sheet
Roll dough into large rectangle:
- About 10 x 20 inches
- Thickness around 4 millimeters
Trim edges neatly.
Trimming exposes layers and helps expansion.
S9 — Cutting Triangles
Cut long triangles:
- Base about 4 inches
- Height about 8–10 inches
Make a small slit at triangle base.
This helps create curved crescent shape.
Step 10 — Shaping
Stretch triangle gently.
Roll tightly from base to tip.
Do not compress layers.
Place tip underneath croissant on baking tray.
Curve ends inward slightly.
Leave enough space because croissants expand heavily during proofing.
Step 11 — Proofing
Proof at moderate room temperature.
Ideal environment:
- Slightly warm
- Not hot
Too much heat melts butter.
Proofing takes:
- 2 to 4 hours
Croissants should:
- Jiggle slightly
- Look puffy
- Increase noticeably in size
Underproofed croissants:
- Dense interior
- Butter leakage
- Poor rise
Overproofed croissants:
- Collapse
- Weak structure
Step 12 — Egg Wash
Whisk egg and milk.
Brush lightly over croissants.
Avoid brushing cut edges because sealing layers prevents expansion.
Step 13 — Baking
Preheat oven to:
- 400°F
- 200°C
Bake:
- 10 minutes at high heat
Then reduce to:
- 375°F
- 190°C
Continue baking:
- 10–15 minutes
Croissants should become:
- Deep golden brown
- Crisp
- Light
The kitchen should smell intensely buttery.
Cooling
Cool at least 20 minutes before eating.
Fresh croissants continue setting internally after baking.
Cutting too early compresses layers.
Texture Expectations
Perfect croissants should have:
Exterior:
- Crisp
- Shattery
- Deep golden
Interior:
- Open honeycomb structure
- Soft
- Moist but airy
Flavor:
- Rich butter
- Slight sweetness
- Mild fermentation notes
Common Problems and Solutions
Butter Leaking During Baking
Possible causes:
- Dough too warm
- Butter block uneven
- Underproofing
Solution:
- Keep everything cold
Dense Interior
Possible causes:
- Insufficient proofing
- Overhandling
- Poor lamination
Solution:
- Proof longer
- Roll gently
Butter Breaking Through Dough
Possible causes:
- Butter too cold
- Rough rolling
Solution:
- Let butter soften slightly before laminating
Uneven Layers
Possible causes:
- Uneven rolling
- Crooked folds
Solution:
- Use ruler
- Work slowly
Professional Tips
Use European-Style Butter
Higher butterfat creates:
- Better flavor
- Better lamination
- Cleaner layers
Chill Frequently
Warm dough is the enemy.
If dough softens:
- Refrigerate immediately
Flour Lightly
Too much flour:
- Toughens dough
- Prevents proper sealing
Sharp Cuts Matter
Use sharp knife or pizza cutter.
Dull blades crush layers.
Optional Variations
Chocolate Croissants
Add dark chocolate batons before rolling.
Known as:
- Pain au chocolat
Almond Croissants
Fill baked croissants with:
- Almond cream
- Sliced almonds
- Powdered sugar
Ham and Cheese
Add:
- Gruyère
- Ham slices
Excellent savory variation.
Storage
Best eaten same day.
However:
Room temperature:
- Up to 2 days
Freezer:
- Up to 2 months
Reheat in oven:
- 350°F for 5–7 minutes
Avoid microwave because it softens layers.
Why Croissants Take So Long
The long process is necessary because:
- Butter must remain cold
- Gluten must relax
- Fermentation develops flavor
- Layers require resting
Fast croissants rarely achieve authentic texture.
Final Notes
Croissants are considered one of the great tests of pastry skill because they combine:
- Fermentation
- Dough handling
- Lamination
- Temperature management
- Precision timing
Even imperfect homemade croissants are often better than average bakery versions because they are eaten fresh.
The more times you make them, the more intuitive the process becomes.