 James
James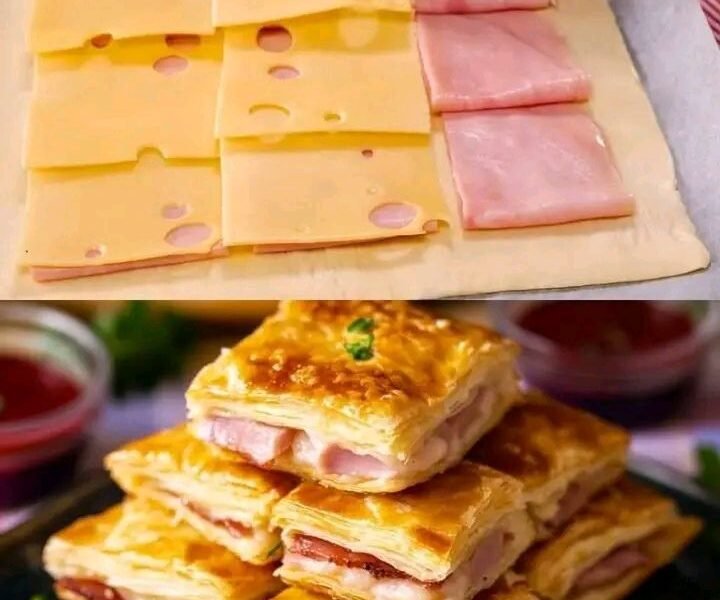
Ham and Cheese Puff Pastry
Ham and cheese puff pastry is one of those recipes that looks elegant and bakery-quality but is actually very manageable at home. The combination of buttery, flaky pastry with savory ham and melted cheese creates something that works equally well for breakfast, lunch, appetizers, parties, or even a light dinner with soup or salad. This version is intentionally detailed and thorough so you can understand every stage, avoid common mistakes, and adapt the recipe to your preferences.
Introduction
Puff pastry is made from layers of dough and butter that expand dramatically in the oven due to steam. When baked correctly, the pastry becomes crisp, airy, golden, and deeply buttery. Pairing it with salty ham and rich cheese creates a balanced filling that is satisfying without requiring complicated preparation.
This recipe can be made in many shapes:
- Large braided pastry
- Individual pockets
- Turnovers
- Pinwheels
- Roll-ups
- A savory pastry log
- Mini appetizer bites
The instructions below focus mainly on a classic folded puff pastry pocket, while also explaining variations later in the recipe.
Yield
Makes approximately:
- 8 medium pastries
or - 16 small appetizer portions
Preparation Time
- Preparation: 35 to 45 minutes
- Chilling time: 20 to 30 minutes
- Baking time: 20 to 30 minutes
- Total time: About 1 hour 30 minutes
Ingredients
For the Pastry
- 2 sheets frozen puff pastry, thawed according to package instructions
- 1 tablespoon flour for dusting the surface
For the Filling
- 250 grams cooked ham, sliced or diced
- 250 grams cheese, shredded or sliced
Best cheese options include:
- Swiss cheese
- Gruyère
- Cheddar
- Mozzarella
- Monterey Jack
- Gouda
- Provolone
You can also combine multiple cheeses for deeper flavor.
Optional Flavor Additions
These ingredients are optional but highly recommended if you want a more complex filling.
- 1 tablespoon Dijon mustard
- 2 tablespoons cream cheese
- 1 tablespoon mayonnaise
- 1 teaspoon garlic powder
- 1 teaspoon onion powder
- 1 teaspoon dried parsley
- 1 teaspoon Italian seasoning
- Freshly cracked black pepper
- Pinch of chili flakes
- 2 tablespoons finely chopped chives
- 2 tablespoons caramelized onions
Egg Wash
- 1 egg
- 1 tablespoon milk or water
The egg wash helps create a shiny golden crust.
Equipment Needed
- Baking tray
- Parchment paper
- Rolling pin
- Sharp knife or pizza cutter
- Pastry brush
- Mixing bowl
- Fork
Understanding Puff Pastry
Before starting, it helps to understand a few important points about puff pastry.
Keep It Cold
Puff pastry rises because cold butter trapped between layers releases steam in the oven. If the dough becomes warm before baking:
- Butter melts too early
- Layers collapse
- Pastry becomes greasy
- Rise becomes uneven
Always work quickly and return pastry to the refrigerator if it softens.
Do Not Overfill
Too much filling can cause:
- Leaking cheese
- Soggy bottoms
- Torn pastry
- Uneven baking
Moderate filling gives the best results.
Preheat the Oven Properly
Puff pastry requires strong initial heat to puff correctly. A fully preheated oven is essential.
Step-by-Step Instructions
Step 1: Thaw the Puff Pastry
Most frozen puff pastry needs approximately 30 to 45 minutes at room temperature.
The pastry should become:
- Flexible enough to unfold
- Still cool to the touch
- Not sticky or soft
If it cracks heavily while unfolding, it is still too cold.
If it becomes limp or oily, it is too warm.
Step 2: Prepare the Filling
In a mixing bowl combine:
- Ham
- Cheese
- Optional seasonings
- Mustard or cream cheese if using
Mix gently until evenly combined.
You can leave the filling chunky or finely chop it depending on texture preference.
For a creamier filling, add:
- Cream cheese
or - A spoonful of béchamel sauce
Avoid adding watery ingredients because they can make the pastry soggy.
Step 3: Prepare the Work Surface
Lightly dust the counter with flour.
Unfold the puff pastry carefully.
Roll lightly only if needed. Do not press too hard because excessive rolling compresses the layers.
A gentle roll helps:
- Smooth fold lines
- Slightly enlarge the pastry
- Create even thickness
Step 4: Cut the Pastry
For medium pastries:
Cut each sheet into 4 rectangles.
For appetizer portions:
Cut into smaller squares.
For large family-style pastry:
Leave the sheet whole.
Step 5: Add the Filling
Place filling slightly off-center on each rectangle.
Leave a border around the edges, about 1.5 centimeters.
Avoid spreading filling all the way to the edges.
Step 6: Seal the Pastries
Fold the pastry over the filling.
Press edges gently using fingers first.
Then seal with a fork.
This creates decorative edges while helping prevent leaks.
If the dough feels warm or sticky, refrigerate for 10 minutes before continuing.
Step 7: Vent the Pastry
Use a knife to cut small slits on top.
This allows steam to escape during baking.
Without vents, pastries may burst unpredictably.
Step 8: Apply Egg Wash
Whisk together:
- Egg
- Milk or water
Brush lightly over the tops only.
Do not let excessive egg wash drip onto the sides because it can glue the layers together and reduce puffing.
Step 9: Chill Before Baking
Place assembled pastries in the refrigerator for 15 to 20 minutes.
This step greatly improves:
- Layer definition
- Puff height
- Shape retention
Many people skip this step, but it makes a noticeable difference.
Step 10: Bake
Preheat oven to:
220∘C
or
425∘F
Bake for:
- 20 to 30 minutes
The pastries should become:
- Deep golden brown
- Crisp
- Fully puffed
If the tops brown too quickly before the centers finish baking, loosely tent with foil.
Step 11: Cool Slightly
Allow pastries to cool for 5 to 10 minutes before serving.
The filling inside remains extremely hot immediately after baking.
Cooling also helps the cheese set slightly.
Texture and Flavor Expectations
A properly baked ham and cheese puff pastry should have:
Exterior
- Crisp flaky layers
- Golden color
- Light buttery crunch
Interior
- Melted cheese
- Savory ham
- Soft but not soggy center
Common Mistakes and How to Avoid Them
Problem: Pastry Did Not Puff
Possible causes:
- Dough became too warm
- Oven was not hot enough
- Egg wash dripped down edges
- Dough was compressed too much
Problem: Bottom Is Soggy
Possible causes:
- Wet filling
- Underbaking
- Too much cheese
- Baking tray overcrowding
Solutions:
- Bake longer
- Use parchment paper
- Avoid watery ingredients
- Chill before baking
Problem: Cheese Leaks Out
Possible causes:
- Overfilling
- Poor sealing
- Filling too close to edges
Variations
1. Croissant-Style Roll
Cut triangles and roll from the wide end toward the tip.
This creates a crescent shape.
2. Braided Puff Pastry
Place filling in the center of a large pastry sheet.
Cut strips along both sides.
Fold strips over each other in a braid pattern.
This presentation looks impressive for gatherings.
3. Breakfast Version
Add:
- Scrambled eggs
- Breakfast ham
- Sharp cheddar
4. Pizza Style
Add:
- Mozzarella
- Pepperoni
- Pizza sauce
- Italian herbs
5. Spicy Version
Add:
- Jalapeños
- Pepper jack cheese
- Chili flakes
- Hot sauce
6. Gourmet Version
Use:
- Gruyère
- Prosciutto
- Caramelized onions
- Thyme
7. Chicken and Cheese Version
Replace ham with cooked shredded chicken.
Sauce Ideas
Ham and cheese puff pastry pairs very well with dipping sauces.
Honey Mustard Sauce
Mix:
- 2 tablespoons mustard
- 1 tablespoon honey
- 1 tablespoon mayonnaise
Garlic Aioli
Mix:
Cheese Sauce
A warm cheddar sauce creates a richer appetizer-style dish.
Serving Suggestions
Serve with:
- Tomato soup
- Garden salad
- Potato wedges
- Roasted vegetables
- Pickles
- Coleslaw
For brunch, pair with:
- Fruit salad
- Coffee
- Eggs
Storage Instructions
Refrigerator
Store in an airtight container for:
- Up to 3 days
Freezer
Freeze baked pastries for:
- Up to 2 months
Wrap individually for best quality.
Reheating Instructions
Oven Method
Bake at:
190∘C
for 8 to 12 minutes.
This keeps the pastry crisp.
Air Fryer Method
Heat at:
180∘C
for 4 to 6 minutes.
Microwave Method
Possible but not ideal.
The pastry becomes soft instead of flaky.
Make-Ahead Instructions
You can assemble the pastries one day ahead.
Keep refrigerated unbaked.
Apply egg wash just before baking.
You can also freeze unbaked pastries directly on a tray, then transfer to freezer bags once solid.
Bake from frozen by adding approximately:
5 to 10 minutes
to the baking time.
Nutrition Estimate Per Medium Pastry
Approximate values vary depending on cheese and pastry brand.
- Calories: 350 to 450
- Protein: 14 to 18 grams
- Carbohydrates: 22 to 30 grams
- Fat: 22 to 30 grams
Tips for Bakery-Style Results
Use High-Quality Cheese
Better cheese melts more smoothly and provides richer flavor.
Bake Until Truly Golden
Pale pastry often means underbaked interior layers.
Deep golden color usually equals better texture.
Rotate the Tray
Halfway through baking, rotate the tray for even browning.
Avoid Steam Build-Up
Do not overcrowd the tray.
Good airflow helps crispness.
Entertaining and Party Ideas
Mini puff pastries are excellent for:
- Eid gatherings
- Ramadan iftar tables
- Tea parties
- School events
- Potlucks
- Game nights
- Holiday appetizers
You can make multiple fillings in one batch.
Advanced Techniques
Double Cheese Layer
Place one cheese layer below the ham and another above it.
This creates richer texture.
Parmesan Crust
Sprinkle grated parmesan on top before baking.
It forms a crispy savory crust.
Sesame or Poppy Seeds
Add seeds over egg wash for visual appeal and flavor.
Final Thoughts
Ham and cheese puff pastry is versatile, comforting, and surprisingly customizable. Once you learn the basics of handling puff pastry correctly, you can create endless savory combinations. The key techniques are keeping the dough cold, avoiding excess moisture, sealing carefully, and baking at high heat until fully golden.
The result is a flaky, buttery pastry with melted cheese and savory ham in every bite.