 James
James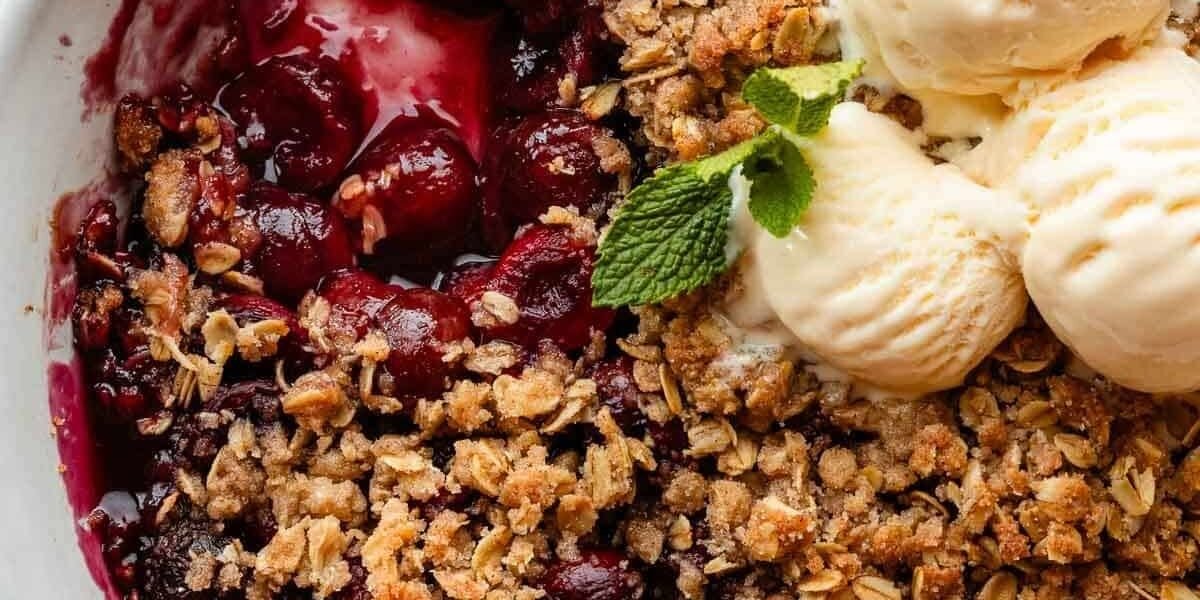
Homemade Cherry Crisp is a classic dessert with a juicy fruit filling and a buttery, crunchy oat topping. It is delicious served warm on its own or with vanilla ice cream, whipped cream, or a drizzle of heavy cream. This detailed recipe explains every step, including ingredient preparation, baking tips, storage, and variations to help you achieve excellent results.
Preparation Time
- Preparation Time: 25 minutes
- Baking Time: 45–55 minutes
- Total Time: About 1 hour 20 minutes
- Servings: 8–10
Ingredients
For the Cherry Filling
- 6 cups fresh cherries, pitted (or frozen cherries, thawed and drained)
- ¾ cup granulated sugar
- ¼ cup brown sugar
- 3 tablespoons cornstarch
- 1 tablespoon fresh lemon juice
- 1 teaspoon vanilla extract
- ½ teaspoon almond extract (optional but highly recommended)
- ¼ teaspoon salt
- ½ teaspoon ground cinnamon (optional)
For the Crisp Topping
- 1½ cups old-fashioned rolled oats
- 1¼ cups all-purpose flour
- ¾ cup brown sugar
- ¼ cup granulated sugar
- 1 teaspoon ground cinnamon
- ¼ teaspoon ground nutmeg
- ½ teaspoon salt
- ¾ teaspoon baking powder
- ½ cup chopped pecans or walnuts (optional)
- ¾ cup cold unsalted butter, cut into small cubes
Optional Garnishes
- Vanilla ice cream
- Fresh whipped cream
- Extra fresh cherries
- Toasted sliced almonds
- Powdered sugar
- Mint leaves
Equipment Needed
- 9 × 13-inch baking dish
- Large mixing bowl
- Medium mixing bowl
- Measuring cups
- Measuring spoons
- Pastry cutter, fork, or fingertips
- Rubber spatula
- Cherry pitter
- Knife
- Cutting board
- Cooling rack
Step 1: Prepare the Cherries
Wash the cherries thoroughly under cool running water.
Remove every stem.
Pit each cherry using a cherry pitter or carefully remove the pits with a small knife.
If the cherries are very large, cut them in half.
If using frozen cherries:
- Thaw completely.
- Drain away excess liquid.
- Pat lightly with paper towels.
Removing extra moisture helps prevent a watery filling.
Step 2: Prepare the Baking Dish
Preheat your oven to 350°F (175°C).
Lightly grease the baking dish with butter or nonstick cooking spray.
This prevents sticking and makes serving much easier.
Step 3: Make the Cherry Filling
In a large bowl combine:
- Cherries
- Granulated sugar
- Brown sugar
- Cornstarch
- Lemon juice
- Vanilla extract
- Almond extract
- Salt
- Cinnamon
Mix gently until every cherry is evenly coated.
Allow the mixture to rest for 10–15 minutes.
During this time the cherries release juice while the sugar begins dissolving.
The cornstarch will later thicken these juices into a glossy filling.
Step 4: Transfer Filling
Pour the cherry mixture into the prepared baking dish.
Spread it evenly using a spatula.
Do not pack the cherries tightly.
An even layer helps the dessert bake consistently.
Step 5: Make the Crisp Topping
In another large bowl combine:
- Rolled oats
- Flour
- Brown sugar
- Granulated sugar
- Cinnamon
- Nutmeg
- Salt
- Baking powder
Whisk everything together until evenly mixed.
Step 6: Add Butter
Add the cold butter cubes.
Using a pastry cutter, fork, or your fingertips, work the butter into the dry ingredients.
Continue until the mixture resembles coarse crumbs.
You should still see small pieces of butter throughout the mixture.
These butter pieces create a flaky, crisp topping.
If using chopped nuts, stir them in now.
Step 7: Add the Topping
Sprinkle the topping evenly across the cherries.
Avoid pressing it down.
A loose topping becomes crispier while baking.
Cover every section of fruit for the best texture.
Step 8: Bake
Place the baking dish on the center oven rack.
Bake for 45–55 minutes.
The crisp is ready when:
- The topping is golden brown.
- The cherry filling bubbles around the edges.
- The center is bubbling gently.
- The topping feels crisp to the touch.
If the topping browns too quickly, loosely cover it with aluminum foil during the final 15 minutes.
Step 9: Cool
Remove from the oven.
Allow the crisp to cool for at least 20–30 minutes.
Cooling allows the filling to thicken naturally.
Serving immediately may result in a runny filling.
Step 10: Serve
Spoon generous portions into bowls.
Serve warm.
Popular serving options include:
- Vanilla ice cream
- Fresh whipped cream
- Heavy cream
- Greek yogurt
- Custard
- Caramel sauce
Tips for the Best Cherry Crisp
Use ripe cherries that are naturally sweet.
Taste the cherries before adding sugar.
If they are especially sweet, reduce the sugar slightly.
If they are tart, add an extra tablespoon or two of sugar.
Always use cold butter.
Cold butter creates a crisp, crumbly topping.
Do not melt the butter.
Do not overmix the topping.
Small butter pieces melt during baking and create wonderful texture.
Old-fashioned oats provide the best crunch.
Quick oats create a softer topping.
Steel-cut oats are not recommended.
Allow the crisp to cool before serving.
The filling thickens as it cools.
Choosing the Best Cherries
Sweet cherries produce a rich dessert with balanced sweetness.
Tart cherries create a brighter, more tangy flavor.
Both fresh and frozen cherries work well.
Dark red cherries often provide the deepest flavor and color.
Avoid cherries that are bruised, wrinkled, or overly soft.
Flavor Variations
Add orange zest for a fresh citrus aroma.
Mix cherries with blueberries.
Combine cherries with raspberries.
Add sliced peaches.
Mix in strawberries.
Add blackberries.
Include diced apples.
Use pears for a softer texture.
Sprinkle shredded coconut into the topping.
Add chopped pistachios.
Add extra cinnamon.
Include a pinch of cardamom.
Try a little ginger.
Mix white chocolate chips into the topping.
Add dark chocolate chunks after baking.
Extra Crunch Ideas
Increase the oats slightly.
Add chopped almonds.
Mix in sunflower seeds.
Add pumpkin seeds.
Use toasted pecans.
Use toasted walnuts.
Sprinkle coarse sugar over the topping before baking.
Make-Ahead Instructions
Prepare the filling one day ahead.
Store it covered in the refrigerator.
Prepare the topping separately.
Keep it refrigerated.
When ready to bake:
Assemble the crisp.
Bake as directed.
You may need an extra 5–10 minutes if baking directly from the refrigerator.
Freezing Instructions
Assemble the unbaked crisp.
Wrap tightly with plastic wrap.
Cover with aluminum foil.
Freeze for up to 3 months.
Bake directly from frozen.
Add approximately 20–30 extra minutes of baking time.
Storage
Store leftovers covered in the refrigerator.
They remain fresh for up to 4 days.
For longer storage, freeze individual portions.
Reheating
Oven:
Bake at 350°F (175°C) for about 15–20 minutes until warmed through.
Microwave:
Heat individual servings for 30–60 seconds.
The oven preserves the crisp topping better than the microwave.
Common Mistakes to Avoid
Using warm butter.
Skipping the cornstarch.
Not draining frozen cherries.
Adding too much liquid.
Overmixing the topping.
Removing the crisp before the filling bubbles.
Serving immediately without cooling.
Using under-ripe fruit.
Overbaking until the filling dries out.
Pressing the topping firmly onto the fruit.
Nutrition (Approximate Per Serving)
- Calories: 390
- Protein: 5 g
- Carbohydrates: 57 g
- Fat: 17 g
- Saturated Fat: 10 g
- Fiber: 4 g
- Sugar: 34 g
- Sodium: 180 mg
Values will vary depending on ingredients used.
Serving Suggestions
Homemade Cherry Crisp pairs wonderfully with hot coffee, black tea, cappuccino, latte, hot chocolate, or cold milk. It also makes an excellent dessert for family dinners, holidays, summer gatherings, potlucks, birthdays, and weekend baking. The contrast between the warm, juicy cherry filling and the crisp, buttery topping makes every bite satisfying. Whether served fresh from the oven or enjoyed as leftovers the next day, this dessert remains flavorful, comforting, and easy to prepare. With quality cherries, careful preparation, and patient cooling time, you can create a homemade cherry crisp that is beautifully golden, bursting with fruit, and delicious enough to become a favorite recipe for years to come.