 James
James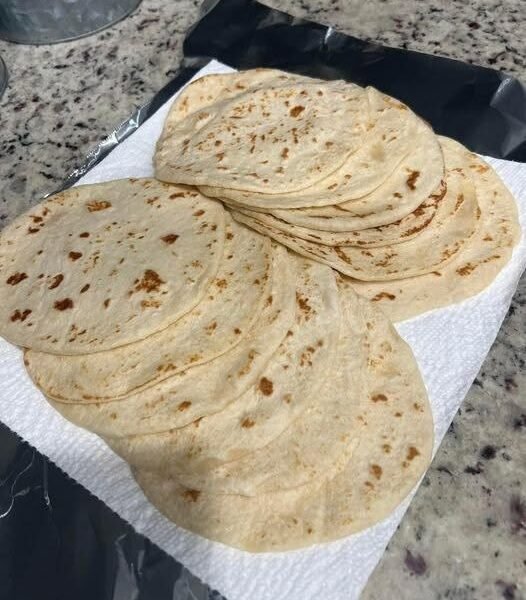
Introduction
Sourdough tortillas are soft, flavorful flatbreads made using sourdough starter instead of commercial yeast. The sourdough starter adds a gentle tang, improves texture, and helps create flexible tortillas that work well for tacos, wraps, burritos, quesadillas, or simply served warm with butter.
This recipe is intentionally detailed, covering every stage from preparing the dough to storing the finished tortillas.
Ingredients
Dry Ingredients
- 500 grams (4 cups) all-purpose flour
- 8 grams (1½ teaspoons) fine sea salt
- 1 teaspoon baking powder (optional for extra softness)
Wet Ingredients
- 200 grams active sourdough starter
- 170–220 grams warm water
- 60 grams melted butter, olive oil, avocado oil, or softened lard
Extra flour for rolling.
Equipment
- Large mixing bowl
- Kitchen scale
- Measuring cups and spoons
- Rolling pin
- Cast-iron skillet or heavy frying pan
- Clean kitchen towel
- Dough scraper
- Plastic wrap or bowl cover
- Cooling rack
Step 1: Prepare Ingredients
Measure every ingredient before beginning.
Room-temperature ingredients mix more evenly than cold ingredients.
Warm water should feel pleasantly warm rather than hot. Excessive heat may damage the natural yeast living inside the sourdough starter.
Step 2: Combine Dry Ingredients
Place flour into a large mixing bowl.
Add:
- Salt
- Baking powder (optional)
Whisk thoroughly until evenly combined.
Even distribution prevents salty or bitter spots inside finished tortillas.
Step 3: Add Wet Ingredients
Pour into the bowl:
- Sourdough starter
- Melted butter or oil
- Most of the warm water
Mix gently using a spoon or hand.
Add remaining water gradually until a soft dough forms.
Different flour brands absorb different amounts of water, so adjustments may be necessary.
Step 4: Mix Dough
Continue mixing until no dry flour remains.
The dough should become:
- Soft
- Smooth
- Slightly tacky
- Easy to handle
Avoid making the dough overly sticky.
Step 5: Knead
Transfer dough onto a lightly floured surface.
Knead for approximately 8–10 minutes.
Push dough forward.
Fold back.
Rotate.
Repeat continuously.
Proper kneading develops gluten, producing flexible tortillas rather than crumbly ones.
Finished dough should appear smooth and elastic.
Step 6: First Rest
Shape dough into a ball.
Place inside a lightly oiled bowl.
Cover using plastic wrap or a damp towel.
Allow dough to rest for 30 minutes.
This resting period hydrates the flour and relaxes gluten.
Step 7: Fermentation
Leave covered dough at room temperature.
Typical fermentation:
- 4–8 hours for mild flavor
- Overnight (8–12 hours) for deeper sourdough flavor
Cool kitchens require longer fermentation.
Warm kitchens shorten fermentation time.
The dough should expand slightly without necessarily doubling.
Step 8: Divide Dough
Transfer dough onto the work surface.
Divide into equal pieces.
Typical sizes:
- 45 grams for taco tortillas
- 60 grams for medium tortillas
- 80 grams for burrito tortillas
Shape every portion into a smooth ball.
Step 9: Second Rest
Arrange dough balls on a tray.
Cover completely.
Allow resting for 20–30 minutes.
Relaxed dough rolls much more easily.
Skipping this step often results in dough shrinking back.
Step 10: Heat Pan
Preheat a dry cast-iron skillet over medium-high heat.
Proper heat remains essential.
Too cool:
- Pale tortillas
- Dry texture
Too hot:
- Burned exterior
- Undercooked center
The pan should already be fully heated before cooking begins.
Step 11: Roll Tortillas
Lightly flour the counter.
Flatten one dough ball.
Roll outward from the center.
Rotate frequently.
Continue until approximately:
- 6 inches for small tortillas
- 8 inches for medium tortillas
- 10–12 inches for large tortillas
Aim for even thickness.
Thin spots cook too quickly.
Thick spots remain doughy.
Step 12: Cook First Side
Place rolled tortilla onto the hot skillet.
Cook for 20–30 seconds.
Small bubbles should begin forming.
Light brown spots indicate proper cooking.
Step 13: Flip
Turn tortilla over.
Cook another 20–40 seconds.
Large air pockets may inflate.
This indicates excellent gluten development.
Step 14: Final Turn
Flip once more.
Cook approximately 10–15 seconds.
Avoid prolonged cooking.
Overcooking creates stiff tortillas.
Step 15: Keep Warm
Transfer cooked tortilla beneath a clean towel.
Stack additional tortillas on top.
Steam trapped inside the towel keeps every tortilla soft.
Tips for Success
- Avoid excessive flour while rolling.
- Keep dough covered between batches.
- Maintain steady skillet temperature.
- Roll evenly.
- Do not overcook.
- Stack immediately after cooking.
- Fresh tortillas remain softer than cooled ones.
Flavor Variations
Add any of the following:
- Garlic powder
- Onion powder
- Smoked paprika
- Chili powder
- Ground cumin
- Black pepper
- Dried oregano
- Fresh chopped cilantro
- Spinach powder
- Beet powder
- Turmeric
- Fresh herbs
Whole Wheat Version
Replace half of the all-purpose flour with whole wheat flour.
Whole wheat absorbs additional moisture.
Add extra water gradually until the dough becomes soft.
Longer resting also improves tenderness.
Butter Version
Butter creates:
- Rich flavor
- Tender texture
- Soft bite
Melt completely before mixing.
Olive Oil Version
Olive oil produces:
- Slightly lighter tortillas
- Mild fruity flavor
- Excellent flexibility
Extra-virgin olive oil provides the strongest flavor.
Lard Version
Traditional tortillas commonly use lard.
Benefits include:
- Exceptional softness
- Excellent flexibility
- Rich flavor
- Longer freshness
Common Problems
Dough Too Dry
Add small amounts of warm water.
Mix thoroughly after every addition.
Dough Too Sticky
Dust lightly with flour.
Avoid adding large amounts.
Tortillas Shrink
Allow dough balls additional resting time.
Tortillas Become Hard
Reduce cooking time.
Stack beneath towels immediately.
No Brown Spots
Increase skillet temperature slightly.
Burned Surface
Reduce heat.
Continue cooking slightly longer instead.
Storage
Cool completely.
Place into an airtight container or zip-top bag.
Room temperature:
- Up to 2 days
Refrigerator:
- Up to 1 week
Freezer:
- Up to 3 months
Separate layers using parchment paper.
Reheating
Heat inside a dry skillet for 15–20 seconds per side.
Or wrap several tortillas in a damp towel and microwave briefly until warm.
Serving Ideas
These sourdough tortillas pair well with:
- Scrambled eggs
- Grilled chicken
- Beef
- Pulled pork
- Fish
- Shrimp
- Roasted vegetables
- Beans
- Rice
- Cheese
- Avocado
- Salsa
- Guacamole
- Hummus
- Falafel
- Curry
- Breakfast fillings
- Peanut butter and honey
- Cinnamon sugar
- Nutella
- Fresh fruit
Final Notes
Patience during fermentation, proper kneading, adequate resting, and careful cooking all contribute to soft, flexible, flavorful sourdough tortillas. With practice, each batch becomes easier to prepare, and small adjustments to hydration, fermentation time, and cooking temperature can be used to match personal preferences for thickness, chewiness, and tanginess.