 James
James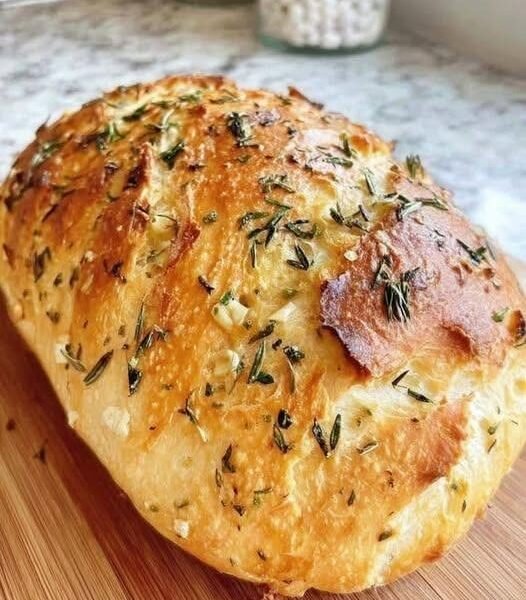
This recipe makes a soft loaf of homemade bread using an air fryer. It is written with plenty of detail so that even a beginner can follow every stage.
Ingredients
For the Dough
- 3½ cups bread flour (or all-purpose flour)
- 2¼ teaspoons instant yeast (1 packet)
- 1 tablespoon sugar
- 1 teaspoon salt
- 1 cup warm water (about 38–43°C / 100–110°F)
- 2 tablespoons olive oil or melted butter
Optional for the Top
- 1 tablespoon melted butter
- Sesame seeds
- Poppy seeds
- Dried herbs
- Garlic powder
Equipment
- Air fryer
- Large mixing bowl
- Measuring cups
- Measuring spoons
- Wooden spoon or spatula
- Clean kitchen towel
- Small baking pan or cake pan that fits inside the air fryer
- Parchment paper
Step 1: Prepare the Yeast
Pour the warm water into a bowl.
Add the sugar.
Sprinkle the yeast over the surface.
Leave it undisturbed for about 5 to 10 minutes.
The mixture should become bubbly and foamy. That means the yeast is active.
If nothing happens after 10 minutes, use fresh yeast and start again.
Step 2: Mix the Dough
Place the flour into a large bowl.
Add the salt.
Mix the dry ingredients together.
Pour in the yeast mixture.
Add the olive oil.
Stir with a spoon until everything begins to come together.
Eventually the dough will become shaggy.
Step 3: Knead the Dough
Transfer the dough onto a lightly floured work surface.
Knead by pushing the dough away with the heel of your hand.
Fold it back.
Turn it slightly.
Repeat this process.
Continue kneading for around 8 to 12 minutes.
The dough should gradually become smooth, soft, and elastic.
If it sticks badly, sprinkle on a tiny amount of flour.
Avoid adding too much flour because the bread may become dry.
Step 4: First Rise
Lightly oil a clean bowl.
Place the dough inside.
Turn it once so the outside becomes lightly coated with oil.
Cover the bowl using a clean towel or plastic wrap.
Leave it in a warm place.
Allow the dough to rise for about 60 to 90 minutes.
The dough should approximately double in size.
Step 5: Shape the Dough
Press gently on the risen dough to remove large air pockets.
Shape it into a smooth ball or oval.
Line a small baking pan with parchment paper.
Place the dough inside.
Cover again.
Leave it for another 30 to 45 minutes.
During this second rise the dough becomes lighter and fluffier.
Step 6: Prepare the Air Fryer
Preheat the air fryer to 160°C (320°F) for about 5 minutes.
Every air fryer cooks a little differently, so temperatures and cooking times may need small adjustments.
Step 7: Add Toppings
Brush the top with melted butter.
If desired, sprinkle sesame seeds, herbs, garlic powder, or poppy seeds over the surface.
You can also leave it plain.
Step 8: Bake
Place the pan carefully into the air fryer basket.
Bake at 160°C (320°F) for 20 minutes.
Check the color.
If the bread is browning too quickly, loosely cover it with a small piece of aluminum foil.
Continue cooking for another 10 to 15 minutes.
The finished loaf should have a rich golden-brown crust.
The internal temperature should reach about 93°C (200°F) if measured with a thermometer.
Another simple test is tapping the bottom of the loaf. It should sound hollow.
Step 9: Cooling
Remove the bread carefully.
Place it on a cooling rack.
Allow it to cool for at least 30 minutes.
Cutting too early allows steam to escape, making the bread slightly gummy.
Cooling helps the texture become soft and even.
Storage
Store the bread in a bread bag or airtight container at room temperature for up to 3 days.
For longer storage, slice the bread and freeze it.
Individual slices can be toasted directly from frozen.
Helpful Tips
- Bread flour usually produces a chewier texture than all-purpose flour.
- Warm water activates yeast better than cold water.
- Water that is too hot can damage the yeast.
- Kneading develops gluten, which helps create a soft, airy loaf.
- Rising time depends on room temperature.
- Humid weather may require slightly less flour.
- Dry climates may require slightly more water.
- Do not overcrowd the air fryer because proper air circulation is important.
- Different air fryer models cook differently, so monitor the bread during the first attempt.
Flavor Variations
You can customize the bread by adding:
- Shredded cheddar cheese
- Grated parmesan cheese
- Chopped fresh rosemary
- Chopped parsley
- Minced garlic
- Italian seasoning
- Chopped olives
- Sun-dried tomatoes
- Jalapeños
- Caramelized onions
- Cinnamon and raisins
- Honey
- Pumpkin seeds
- Sunflower seeds
- Flax seeds
- Everything bagel seasoning
Serving Suggestions
This bread pairs well with:
- Butter
- Jam
- Honey
- Soup
- Salad
- Sandwich fillings
- Garlic butter
- Toasted with avocado
- Peanut butter
- Cream cheese
- Fried or scrambled eggs
- Grilled vegetables
- Chicken salad
- Tuna salad
- Homemade burgers
Troubleshooting
If the bread is dense, the yeast may have been inactive or the dough may not have risen enough.
If the bread is dry, too much flour may have been added or it may have baked too long.
If the top becomes dark before the center is cooked, loosely cover it with foil and continue baking.
If the bottom seems pale, return the loaf to the air fryer for a few more minutes without the pan.
If the dough feels sticky while kneading, add flour only a little at a time.
If the dough feels stiff, knead in a teaspoon or two of water until it becomes softer.
With patience and careful attention to each stage, this air fryer bread develops a crisp crust, a soft interior, and a fresh homemade flavor that can be enjoyed for breakfast, lunch, dinner, or snacks.