
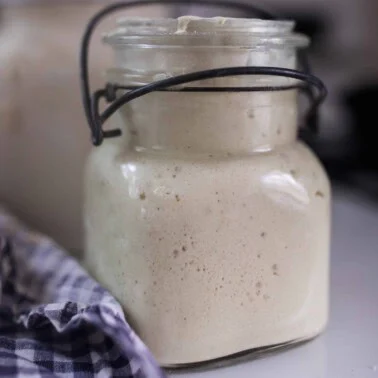

Making your own gluten-free sourdough starter at home is a simple and rewarding way to begin baking delicious gluten-free bread. With just gluten-free flour, water, a clean glass jar, and a little patience, you can grow a living starter that helps your bread develop a tangy flavor, a tender crumb, and a beautiful homemade texture.
Unlike commercial yeast, a sourdough starter relies on naturally occurring yeasts and beneficial bacteria that develop through fermentation. These microorganisms feed on available carbohydrates in the flour and produce acids and gases, creating the characteristic sourdough flavor and helping dough rise.
The best part is that you do not need wheat flour to make a successful starter. Brown rice flour, white rice flour, and sorghum flour are excellent gluten-free options. This beginner-friendly recipe uses brown rice flour because it is easy to work with and provides nutrients that support fermentation.
Recipe at a glance
- Preparation time: 5–10 minutes daily
- Fermentation time: Usually 5–10 days, sometimes longer
- Yield: Approximately 1 cup of starter
- Difficulty: Beginner-friendly
- Ingredients: Gluten-free flour and water
Ingredients
- ½ cup (60 g) gluten-free brown rice flour
- ¼ cup (60 g) room-temperature water, approximately
- Additional brown rice flour and water for daily feedings
Use filtered water or tap water that is suitable for drinking. If your tap water has a strong chlorine smell, filtered water may be preferable.
Choose flour that is explicitly labeled gluten-free, especially if you are baking for someone with celiac disease. Keep your jar, utensils, and work surface clean and free from wheat flour contamination.
Equipment needed
- One clean glass jar, approximately 500 ml capacity
- A spoon or small spatula
- A kitchen scale, if available
- A loose-fitting lid or breathable cover secured to the jar
Do not seal the jar tightly during fermentation because gas needs to escape.
Step-by-step instructions
Day 1: Mix the flour and water
Add 60 g of brown rice flour and approximately 60 g of water to your clean glass jar. Stir until no dry flour remains. The mixture should resemble a thick paste, similar to pancake batter or thick yogurt.
If it feels too stiff to stir, add a teaspoon of water at a time. Scrape down the sides of the jar and loosely cover it.
Leave the jar at room temperature, ideally around 24–27°C (75–81°F), away from direct sunlight and heat sources.
Day 2: Check for early activity
After 24 hours, inspect the mixture. You may notice a few small bubbles, a slightly different smell, or no visible change at all.
Both outcomes are normal. Stir the mixture, then discard approximately half. Add 30 g of brown rice flour and 30 g of water, mixing thoroughly.
Cover loosely and leave it at room temperature again.
Day 3: Continue feeding
Discard approximately half of the starter and feed it with 30 g of brown rice flour and 30 g of water.
You may begin noticing small bubbles or a mild, fruity, earthy, or sour aroma. Some starters become very active early on and then appear quiet for a day or two. This temporary slowdown is common as the microbial community changes.
Do not worry if the starter has not doubled in size yet. Gluten-free starters can behave differently from wheat-based starters, and bubbling is often a more useful early sign of activity.
Days 4–5: Build strength
Continue the daily routine:
- Remove and discard approximately half of the starter.
- Add 30 g of brown rice flour.
- Add 30 g of water.
- Stir well and cover loosely.
As fermentation develops, you should gradually see more bubbles throughout the mixture. The aroma may become pleasantly sour or yogurt-like.
If the starter rises and then falls, that is a sign that fermentation is occurring. Marking the level on the jar with a rubber band can help you observe changes.
If there is little activity, continue feeding once daily and keep the jar somewhere comfortably warm. Avoid adding excessive flour or water in an attempt to force it to rise.
Days 6–10: Check whether it is ready
Continue feeding daily until your starter is consistently bubbly and active. Depending on room temperature, flour type, and water quality, it may take longer than 10 days.
A starter is generally ready for baking when it:
- Produces bubbles throughout the mixture.
- Rises noticeably after feeding and then gradually falls.
- Has a clean, pleasantly tangy or fermented aroma.
- Shows consistent activity over several consecutive feedings.
For greater reliability, look for a predictable rise after feeding on multiple occasions rather than relying on one bubbly day. Gluten-free starters may not double as dramatically as wheat starters, so focus on a clear increase in volume and consistent activity.
How to maintain your gluten-free sourdough starter
Once your starter is active, you can maintain it at room temperature or in the refrigerator.
If baking frequently: Keep the starter at room temperature and feed it daily. Remove some starter before feeding to prevent the jar from becoming too full.
If baking occasionally: Store it in the refrigerator with a loosely fitted lid. Feed it regularly, approximately once a week as a starting routine, and refresh it before baking. If it has been refrigerated for a while, it may need two or more feedings to regain reliable activity.
To prepare a starter for baking, take the amount required by your recipe after it has been fed and is showing strong activity. Keep some starter behind so you can continue maintaining it.
Discarded starter can be used in suitable recipes, such as gluten-free pancakes or crackers, provided it smells normal and has been handled safely. Discard any starter showing signs of spoilage.
Common problems and solutions
My starter is not bubbling. The room may be too cool, or fermentation may simply be taking longer. Keep it in a warmer, stable location and continue daily feedings.
My starter smells sour. A clean, tangy smell is normal. A mild fruity or fermented aroma is also common.
There is liquid on top. A small amount of liquid can indicate that the starter is hungry or has separated. Stir it in or pour it off, then feed the starter. If separation happens repeatedly, adjust the consistency and feeding schedule.
My starter has pink, orange, or fuzzy growth. Discard the entire starter and clean the jar thoroughly. Do not attempt to rescue it by removing only the affected portion.
My starter rises but then collapses. This usually means it has consumed much of its available food. Feed it again and observe how consistently it rises.
Tips for success
- Use a kitchen scale for consistent flour-to-water measurements.
- Keep the starter warm but never hot.
- Use a clean jar and utensils at every feeding.
- Avoid tightly sealing the container.
- Do not expect every gluten-free starter to rise at the same speed.
- Never use a starter with visible mold or unusual pink or orange discoloration.
Remember that making a starter is a process of nurturing a living culture, not following a rigid clock. Temperature, flour composition, and the natural microbial population all affect how quickly it develops.
Final thoughts
A homemade gluten-free sourdough starter is an excellent foundation for baking flavorful bread, pizza crusts, pancakes, muffins, and other gluten-free treats. Although it requires daily attention during the first week, the process is straightforward once you establish a routine.
Start with brown rice flour and water, feed consistently, and watch for reliable bubbling and rising before baking your first loaf. With patience and proper maintenance, your starter can become a long-lasting part of your gluten-free kitchen.
Most importantly, remember that an active starter is more important than the number of days it has been fermenting. Give it time to develop, maintain good hygiene, and enjoy the process of creating your own naturally fermented gluten-free baking ingredient.



Pingback: Gluten Free Sourdough Cinnamon Rolls - diet.qrxl.xyz