 James
James
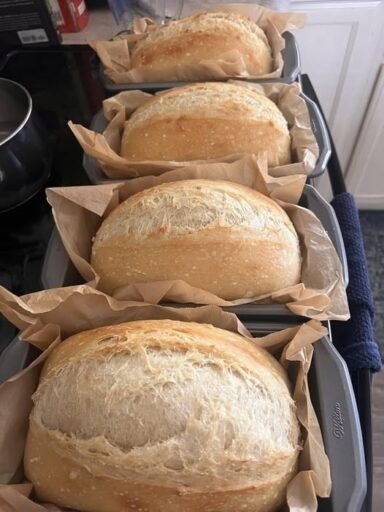
Mini sourdough loaves bring together everything people love about traditional sourdough bread in a charming, small-sized form. Every loaf develops a beautifully crisp crust, a light and airy crumb, and a rich, complex flavor that comes from slow natural fermentation. Small portions bake evenly, cool faster, and make wonderful gifts, dinner rolls, picnic bread, breakfast companions, or sandwich loaves.
These adorable loaves require patience rather than difficult techniques. Slow fermentation allows the natural wild yeast and beneficial bacteria to develop wonderful flavor while creating a loaf with excellent texture. Every stage contributes something special, from mixing and resting to shaping and baking.
Preparation Time
- Starter preparation: 4–8 hours
- Dough mixing: 30 minutes
- Resting and folding: 2½–3 hours
- Cold fermentation: 10–16 hours
- Final proof: 1–2 hours
- Baking: 25–35 minutes
Makes: 8 mini sourdough loaves
Ingredients
Active Starter
- 120 grams active bubbly sourdough starter
- 60 grams bread flour
- 60 grams warm water
Main Dough
- 700 grams bread flour
- 100 grams whole wheat flour
- 580 grams lukewarm water
- 18 grams fine sea salt
- Prepared active starter
Optional Flavor Additions
- Fresh rosemary
- Fresh thyme
- Roasted garlic
- Caramelized onion
- Grated Parmesan
- Sharp cheddar
- Chopped olives
- Sun-dried tomatoes
- Toasted sesame seeds
- Pumpkin seeds
- Flaxseed
- Chopped walnuts
- Dried cranberries
- Everything bagel seasoning
Equipment
- Large mixing bowl
- Dough scraper
- Kitchen scale
- Bannetons or small bowls lined with towels
- Baking stone or baking steel
- Dutch ovens or baking pots
- Sharp bread lame
- Cooling rack
- Spray bottle filled with water
Step One: Prepare the Starter
Feed the sourdough starter several hours before making dough. Keep the starter at room temperature until fully active and doubled. Tiny bubbles throughout the starter show healthy fermentation. A pleasant mildly tangy aroma means everything has developed beautifully.
Step Two: Mix Flour and Water
Combine bread flour, whole wheat flour, and water. Stir until every bit of flour becomes hydrated. No dry patches should remain. Cover the bowl and allow the mixture to rest for about forty-five minutes.
This resting stage helps gluten begin forming naturally and creates dough that becomes easier to handle later.
Step Three: Add Starter and Salt
Spread the active starter across the rested dough. Sprinkle salt over everything. Mix thoroughly with clean hands until completely combined. Continue folding and squeezing the dough until every ingredient becomes evenly distributed.
The dough may feel sticky, soft, and somewhat rough during this stage. That changes during fermentation.
Step Four: Bulk Fermentation
Cover the bowl and allow dough to ferment at room temperature.
Perform gentle stretch-and-fold sessions every thirty minutes during the first two hours.
Grab one side.
Stretch upward.
Fold toward the center.
Rotate the bowl.
Repeat several times.
Each folding session strengthens gluten while trapping tiny air pockets that later create an open crumb.
Continue fermentation until dough noticeably expands and develops a smooth surface.
Step Five: Divide Dough
Turn dough onto a lightly floured work surface.
Divide evenly into eight equal portions.
Use a kitchen scale for consistent loaf size.
Shape every portion gently into a loose round.
Allow dough portions to rest uncovered for twenty minutes.
This short resting period allows gluten to relax before final shaping.
Step Six: Final Shaping
Flip one dough round over.
Stretch the outer edges toward the center.
Continue rotating while building surface tension.
Turn seam side downward.
Cup hands around dough.
Pull gently across the work surface until a smooth round develops.
Repeat with remaining portions.
Proper shaping creates beautiful oven spring.
Step Seven: Proof
Dust proofing baskets or towel-lined bowls generously with flour.
Place every loaf seam side upward.
Cover carefully.
Transfer everything into the refrigerator.
Allow cold fermentation overnight.
Slow fermentation develops remarkable flavor, stronger gluten structure, and easier scoring.
Step Eight: Preheat Oven
Place Dutch ovens inside the oven.
Preheat thoroughly to 250 degrees Celsius.
Allow at least forty-five minutes so baking vessels become completely heated.
Strong initial heat creates dramatic oven spring.
Step Nine: Score
Turn one loaf onto baking paper.
Dust away excess flour.
Use a bread lame or very sharp blade.
Create one deep slash across the top.
Decorative leaves, wheat stalks, spirals, diamonds, and curved patterns may also be added with shallow scoring.
Proper scoring directs expansion while baking.
Step Ten: Bake
Carefully lower loaf into hot Dutch oven.
Cover immediately.
Bake covered for twenty minutes.
Remove lid.
Continue baking another ten to fifteen minutes until deep golden brown.
Repeat with remaining mini loaves.
Every loaf should sound hollow when gently tapped underneath.
Cooling
Transfer baked loaves onto a wire rack.
Allow complete cooling before slicing.
Fresh bread continues setting during cooling.
Early slicing releases steam too quickly and creates a gummy interior.
Serving Suggestions
Serve warm with:
- Butter
- Honey
- Fruit preserves
- Soft cheese
- Herb butter
- Olive oil
- Balsamic vinegar
- Garlic butter
- Tomato soup
- Vegetable soup
- Chicken stew
- Pasta
- Grilled vegetables
- Roasted meats
- Fresh salads
Mini loaves also create beautiful sandwiches filled with roasted vegetables, chicken, smoked salmon, egg salad, tuna salad, turkey, or mozzarella and tomatoes.
Helpful Baking Tips
Always begin with a strong, active starter.
Measure every ingredient accurately.
Avoid adding too much flour during shaping.
Handle dough gently to preserve fermentation bubbles.
Cold dough scores more cleanly than warm dough.
Keep Dutch ovens thoroughly preheated.
Bake until crust develops a rich golden-brown color instead of removing bread too early.
Allow complete cooling for the best crumb texture.
Practice shaping regularly because consistent surface tension produces taller loaves.
Humidity, flour type, and kitchen temperature may slightly change fermentation time.
Flavor Variations
Prepare delightful mini sourdough loaves with countless flavors.
Blend roasted garlic with Parmesan for rich savory bread.
Mix cheddar with fresh chives for breakfast bread.
Add rosemary and thyme for fragrant dinner rolls.
Combine olives with sun-dried tomatoes for Mediterranean flavor.
Fold cinnamon with raisins for a lightly sweet loaf.
Mix cranberries and walnuts during autumn baking.
Use pumpkin seeds, sunflower seeds, flaxseed, and sesame seeds for hearty multigrain bread.
Try jalapeños with cheddar for bold flavor.
Create herb and black pepper loaves for soup night.
Storage
Keep cooled loaves inside a bread box or cloth bread bag for up to three days.
Freeze completely cooled loaves inside airtight freezer bags for up to three months.
Thaw naturally at room temperature before warming inside a hot oven for several minutes to restore the crisp crust.
These miniature sourdough loaves remain wonderfully flavorful, beautifully crusty, and delightfully soft inside, making them perfect for everyday meals, holiday gatherings, gift baskets, afternoon tea, or special family dinners. Their charming appearance, crisp golden exterior, and tender airy crumb make every loaf as attractive as it is delicious.